
📢 Disclosure
This post contains affiliate links. As an Amazon Associate, I earn from qualifying purchases made through links on this page at no additional cost to you. I only recommend products I believe will add value to my readers. Thank you for supporting this blog!
Is a Ring Doorbell Really Worth It?
You’ve probably seen the videos. The porch pirate caught red-handed. The delivery driver leaving a thoughtful note. The neighbor’s dog making an unexpected visit. But beyond the viral moments, there’s a real question every homeowner asks: Does a Ring doorbell actually make my home safer?
Let me share something that happened to me last month. At 2 AM, my Ring doorbell detected motion. My phone buzzed. Through the app, I watched someone checking car doors up and down my street. I immediately called the police and shared the footage. The suspect was caught within hours—all because I could see what was happening in real-time from my bedroom.
That’s when it hit me: this isn’t just a gadget. It’s genuine peace of mind.
But here’s what nobody tells you upfront: choosing the right Ring doorbell is only half the battle. You also need to know how to install it properly, whether you need a subscription, how long the battery actually lasts, and what to do when things go wrong (like when your doorbell starts flashing blue at 3 AM).
In this comprehensive guide, I’m covering everything:
✅ Detailed reviews of the top 3 Ring doorbells
✅ Step-by-step installation guides (wired and wireless)
✅ Ring doorbell subscription costs and what you actually get
✅ How long Ring doorbell batteries last (real-world data)
✅ Troubleshooting tips: how to reset, remove, charge, and fix common issues
✅ Comparing Ring vs. Blink and other competitors
Whether you’re installing your first Ring doorbell or trying to figure out why your current one isn’t working, this guide has you covered.
🔥 Ring Doorbell Reviews 2024: Which Model Should You Buy?
Quick Answer: Ring Doorbell Comparison
| Model | Best For | Power | Video Quality | Price |
|---|---|---|---|---|
| Ring Battery Doorbell | Renters, easy setup | Battery | 1080p HD | $ |
| Ring Video Doorbell Pro 2 | Premium features | Hardwired | 1536p HD+ | $$$ |
| Ring Spotlight Cam Plus | Backyard/side coverage | Battery/Wired | 1080p HD | $$ |
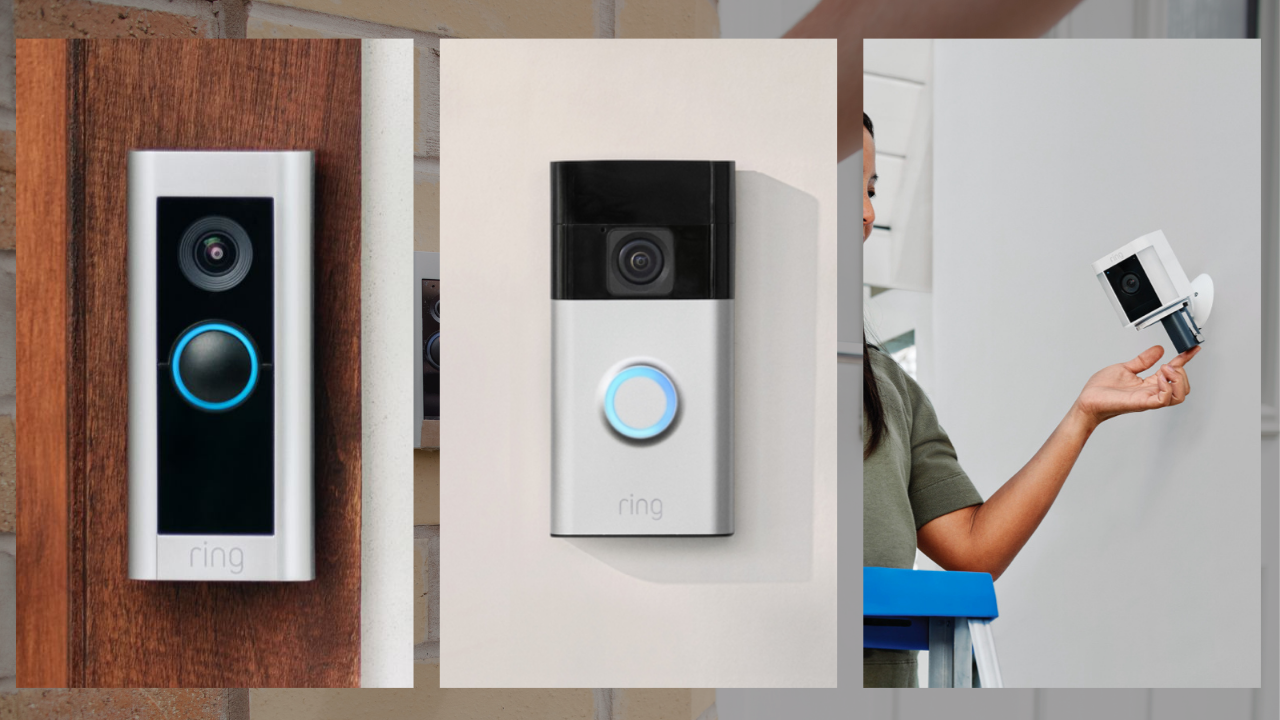
1. Ring Battery Doorbell: Best for Easy Installation
👉 Check latest price on Amazon
If you’re asking “how to install a ring doorbell without existing wiring,” this is your answer. The Ring Battery Doorbell is the brand’s bestseller because it’s genuinely the easiest video doorbell to install—literally anyone can do it in under 20 minutes.
How Does Ring Doorbell Work?
The Battery Doorbell connects to your home Wi-Fi and sends notifications to your phone whenever motion is detected or someone presses the doorbell button. The built-in rechargeable battery powers everything, so there’s no wiring required.
Key Features
- Head-to-Toe Video with 66% more vertical coverage (see packages at your feet!)
- Built-in rechargeable battery with USB-C charging
- 1080p HD video with night vision
- Two-Way Talk so you can speak to visitors from anywhere
- Motion detection with customizable zones
- Works with Alexa for voice announcements
- Tool-free installation—no screwdriver needed for basic setup
How Long Does Ring Doorbell Battery Last?
Real-world answer: 2-3 months on average. However, this varies based on:
- How many motion events you get daily (high-traffic areas drain faster)
- Temperature (cold weather reduces battery life by 20-30%)
- Video quality settings
- How often you use Live View
Pro tip: Users in high-traffic areas report charging every 4-6 weeks, while those with moderate activity get 3+ months per charge.
How to Charge Ring Doorbell Battery
Charging is simple:
- Remove the doorbell from its mounting bracket (press the release tab)
- Plug in the included USB-C cable
- Charge for 4-6 hours until the light turns green
- Snap it back onto the mount
Time-saving tip: Buy a second battery so you can swap instantly without leaving your door unmonitored.
Pros
✅ Installation takes 15-20 minutes (seriously!)
✅ No wiring or electrician needed
✅ Perfect for renters—doesn’t damage walls
✅ Great video quality for the price
✅ Battery life is solid (2-3 months)
✅ Works with existing Ring Chime accessories
Cons
❌ Battery needs periodic charging
❌ Won’t work with traditional mechanical door chimes
❌ Requires Ring subscription for video storage
❌ Fewer advanced features than Pro models
Who It’s Best For
Perfect for renters, first-time Ring users, apartment dwellers, or anyone who wants doorbell security without hiring an electrician. Also ideal for second homes, elderly parents’ houses, or Airbnb properties.
Real User Review: “I bought this a few days ago and I’m honestly impressed with how simple it was to set up. The app walks you through everything step by step, and I had it up and running in under 30 minutes without needing any wiring… Battery life has been solid so far.”

- *See more at your home or business* — Get 66% more vertical coverage with the latest version of Ring’s best-selling Vide…
- *Built-In Battery* — Battery Doorbell includes a built-in battery, which charges with a convenient USB-C charging port. …
- *Install in a snap* — Charge it up, click into place, and stay connected right from your phone.
2. Ring Video Doorbell Pro 2: Best Premium Features
👉 Check latest price on Amazon
Wondering “how much is a Ring doorbell” with all the premium features? The Ring Video Doorbell Pro 2 is Ring’s top-tier model, and while it costs more, it delivers professional-grade security features you won’t find in budget models.
What Makes It Worth the Extra Cost?
The Pro 2 offers 1536p HD+ video (that’s 50% higher resolution than standard 1080p), 3D Motion Detection, and Bird’s Eye View—an aerial map showing exactly where visitors walked on your property. These aren’t just fancy extras; they’re genuinely useful security features.
Key Features
- 1536p Head-to-Toe HD+ Video (best video quality Ring offers)
- 3D Motion Detection with Bird’s Eye View aerial mapping
- Built-in Alexa Greetings (Alexa can answer your door!)
- Advanced motion zones for pinpoint accuracy
- Hardwired installation = 24/7 power, no charging
- Two-Way Talk with Audio+ for crystal-clear conversations
- Works with existing doorbell chimes (finally confirmed!)
- Color Pre-Roll shows 4 seconds before motion was detected
Does Ring Doorbell Require a Subscription?
No, but… you can use all Ring doorbells without a subscription for live viewing and real-time alerts. However, to record and save videos, you need a Ring Protect Plan (more on subscription costs below).
The Pro 2’s exclusive features like Alexa Greetings and Bird’s Eye View require a Ring Protect subscription to work.
Pros
✅ Best video quality in Ring’s lineup
✅ Never worry about charging batteries
✅ 3D motion tracking is incredibly accurate
✅ Bird’s Eye View helps track package thieves
✅ Works with your existing doorbell chime (verified!)
✅ Professional-grade features
Cons
❌ Higher price point
❌ Requires existing doorbell wiring (or you’ll need an electrician)
❌ Best features require Ring Protect subscription
❌ Some users report 3-4 week delivery times
How to Install Ring Doorbell Pro (Wired Version)
You’ll need:
- Existing doorbell wiring (16-24V AC transformer)
- The included screwdriver and mounting hardware
- 20-30 minutes
Quick steps:
- Turn off power at your breaker box
- Remove old doorbell
- Connect Ring’s wires to your existing doorbell wires
- Mount the Pro 2 bracket
- Snap doorbell onto bracket
- Turn power back on
- Complete setup in the Ring app
Important: The Pro 2 comes with a Power Kit Pro that ensures compatibility with your existing chime. Follow the in-app instructions carefully for this step.
Not comfortable with wiring? Amazon offers professional installation services for Ring doorbells (check during checkout).
Who It’s Best For
Homeowners who want premium features, have existing doorbell wiring, and are serious about home security. Perfect if you receive lots of packages or want to monitor your entire front yard with precision.
Real User Experience: “I tried Ring years ago and it didn’t work with my chime, so I returned it. When I saw this Pro 2 stated it WILL ring your existing chime, I decided to try again. Installation was seamless… when I pressed the button, the indoor chime began to sound and the bell worked flawlessly. The picture is very sharp… It’s more expensive but worth it.”

- Premium wired video doorbell with Head-to-Toe HD+ Video, Two-Way Talk with Audio+, 3D Motion Detection, built-in Alexa G…
- *Head-to-Toe HD+ Video -* See more of who stops by and check in on package deliveries down low with improved 1536p Head-…
- *Tailored detection for more exact alerts —* 3D Motion Detection pinpoints motion on your property so you’ll receive mor…
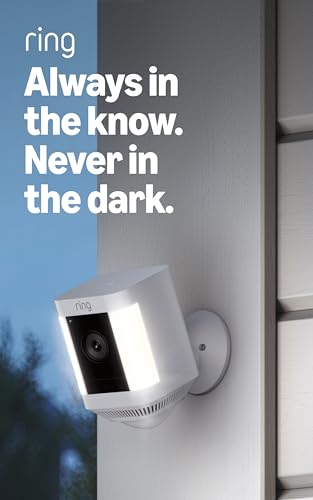
3. Ring Spotlight Cam Plus: Best for Complete Property Coverage
👉 Check latest price on Amazon
Not every security concern is at your front door. The Ring Spotlight Cam Plus gives you flexible security coverage anywhere on your property—with the added bonus of motion-activated LED spotlights.
Why Add a Spotlight Cam?
Think about it: your Ring doorbell covers the front door, but what about:
- Your backyard where the fence gate is
- The side of your house where your AC unit sits
- Your driveway where cars are parked
- Dark corners where intruders could hide
The Spotlight Cam fills these security gaps.
Key Features
- 1080p HD video with Color Night Vision
- Two motion-activated LED spotlights (1000 lumens combined!)
- Built-in security siren you can trigger from your phone
- Battery, solar, or plug-in power options
- Holds 2 batteries for extended runtime
- Customizable motion zones
- Two-Way Talk
- Weather-resistant for year-round outdoor use
- 110° field of view
How to Install Ring Spotlight Cam (Battery Version)
Installation is even easier than the doorbell:
- Charge the battery pack(s) fully
- Insert battery into the camera
- Mount the bracket using the included screws
- Snap camera onto bracket
- Set up in Ring app (scan QR code on camera)
- Adjust angle and motion zones
Total time: 10-15 minutes
Pro tip: Mount 7-9 feet high for optimal motion detection and to prevent tampering.
Mounting Without Drilling
One clever user shared: “To mount on vinyl siding without drilling holes, I bought these clip-on brackets from Amazon and they work perfectly with the camera’s mounting holes. Very easy to attach or move, but be aware they’re easy to remove, so mount up high.”
How Long Does Ring Spotlight Cam Battery Last?
2-3 months on average with normal use. However:
- High-traffic areas: 4-6 weeks
- With solar panel: Indefinitely (solar keeps batteries topped off)
- Cold weather: Reduced to 3-6 weeks
Battery life hack: Buy the Ring Solar Panel ($49) and never charge again. One user reports: “The solar panel does a great job keeping both batteries topped off even when mounted facing due East (not ideal). I now have 6 of these cameras, 5 plugged in and 1 with solar.”
Important Note: Motion-Activated Lights
The LED spotlights only activate on motion when using wired or plug-in power, not battery power alone. Some users report this as inconsistent—if your lights don’t activate on battery power, contact Ring support as this may indicate a defect.
Pros
✅ Install anywhere—no outlets required (battery version)
✅ Dual batteries = longer runtime
✅ LED spotlights deter intruders AND provide useful lighting
✅ Built-in siren is loud and effective
✅ Solar panel option for set-it-and-forget-it power
✅ Excellent value for features
Cons
❌ LED lights need wired power to be motion-activated
❌ Requires Ring Protect for video recording
❌ Slightly heavier than basic cameras
Who It’s Best For
Anyone needing security coverage beyond the front door. Perfect for backyards, garages, driveways, or dark areas. Great for homeowners who want comprehensive property monitoring.
Real User Insight: “I love this camera enough that I bought a second… Image quality is good. The added lights make me feel more secure. They’re easy to set up, and they reliably detect motion.”
Another user who now owns 6 Spotlight Cams shares: “I love the ease of initial setup and the abundance of monitoring options. The various modes allow you to choose when the verbal warning is active. Despite two early camera failures (Ring quickly replaced them), I still give these 4.75 stars.”
- Look in anytime – Watch over your home or business day or night in wide-angle, 1080p HD video with Color Night Vision an…
- Stop intruders in their tracks – With 2 motion-activated LED spotlights that turn on when they detect motion, and sound …
- Focus on important areas – Customizable motion zones let you choose exactly what your camera covers – so you only get no…
💰 Ring Doorbell Subscription Cost: Do You Really Need Ring Protect?
Does Ring Doorbell Require Subscription?
The short answer: No, but you’ll want one.
Here’s what works WITHOUT a Ring Protect subscription:
✅ Live View (watch what’s happening in real-time)
✅ Two-Way Talk (speak to visitors)
✅ Motion alerts (get notified when motion is detected)
✅ Doorbell notifications
Here’s what REQUIRES a Ring Protect Plan:
❌ Video recording and storage
❌ Video history (reviewing past events)
❌ Snapshot Capture
❌ People and package detection alerts
❌ Sharing videos with neighbors or police
❌ Exclusive features like Alexa Greetings (Pro 2)
How Much Is Ring Doorbell Subscription?
Ring Protect Plans (2024 Pricing):
| Plan | Monthly Cost | Annual Cost | What’s Included |
|---|---|---|---|
| Ring Protect Basic | $4.99/month | $49.99/year | 1 device, 180-day video history |
| Ring Protect Plus | $10/month | $100/year | Unlimited devices at one location, extended warranty, 10% off Ring products |
| Ring Protect Pro | $20/month | $200/year | Everything in Plus + 24/7 professional monitoring, cellular backup |
Which Ring Subscription Plan Should You Get?
If you have just 1 Ring device: Ring Protect Basic ($4.99/month)
If you have 2+ Ring devices (or plan to expand): Ring Protect Plus ($10/month) is the better value
If you want full security system: Ring Protect Pro ($20/month) includes 24/7 professional monitoring
My recommendation: Start with Ring Protect Plus ($10/month). It covers unlimited devices, so as you add more cameras (and you probably will), you’re already covered. Plus, the 10% discount on future Ring purchases basically pays for itself.
Money-saving tip: Pay annually instead of monthly and save $20-40/year.
🔧 Ring Doorbell Installation: Complete Step-by-Step Guides
How to Install Ring Battery Doorbell (Wireless)
What you’ll need:
- Ring Battery Doorbell (fully charged)
- Included mounting bracket and screws
- Drill or screwdriver
- Level (optional but helpful)
- 15-20 minutes
Step-by-step:
- Charge the doorbell fully using the included USB-C cable (4-6 hours)
- Download the Ring app (iOS or Android) and create an account
- Choose your mounting location:
- Height: 48 inches (4 feet) from the ground is ideal
- Make sure your Wi-Fi signal reaches (test with your phone first)
- Avoid direct sunlight if possible (helps battery life)
- Ensure a clear view of your entire porch/entryway
- Attach the mounting bracket:
- Hold bracket against wall and mark screw holes with pencil
- Use a level to ensure it’s straight
- Drill pilot holes (for brick/stucco) or just screw directly into wood
- Secure bracket with included screws
- Set up in the Ring app:
- Tap “Set Up Device” → “Doorbells”
- Scan the QR code on the back of your doorbell
- Follow prompts to connect to Wi-Fi
- Name your device (e.g., “Front Door”)
- Test the connection
- Snap doorbell onto bracket:
- Line up the doorbell with the bracket
- Push until you hear a click
- Use the included security screw at the bottom (prevents theft)
- Adjust settings in the app:
- Set motion zones (only alert for your property, not sidewalk traffic)
- Adjust motion sensitivity
- Choose motion frequency
- Set up Smart Alerts if you have Ring Protect
Total installation time: 15-20 minutes
Troubleshooting tip: If your doorbell won’t connect to Wi-Fi during setup, make sure you’re on a 2.4GHz network (not 5GHz). Ring doorbells don’t support 5GHz Wi-Fi.
How to Install Ring Video Doorbell Pro (Wired)
What you’ll need:
- Existing doorbell wiring (16-24V AC transformer)
- Ring Video Doorbell Pro 2
- Included Power Kit Pro
- Wire strippers (if cutting new wire)
- Screwdriver
- Voltage tester (recommended for safety)
- 30-45 minutes
Important: This installation involves electrical wiring. If you’re uncomfortable, hire a professional.
Step-by-step:
- Check your transformer voltage:
- Locate your doorbell transformer (usually in basement, garage, or near your electrical panel)
- Use a voltage tester to confirm it’s 16-24V AC
- If under 16V, you’ll need to upgrade your transformer
- Turn off power at breaker box:
- Find the breaker controlling your doorbell
- Switch it OFF
- Test the old doorbell to confirm power is off
- Remove your old doorbell:
- Unscrew the old doorbell from the wall
- Disconnect the wires (note which wire goes where—take a photo!)
- Don’t let wires fall back into the wall (wrap around a pencil if needed)
- Install the Power Kit Pro:
- Locate your existing chime box (usually inside on a wall)
- Remove the chime cover
- Install the Power Kit Pro per the included instructions
- This ensures the doorbell gets proper power AND your chime still works
- Connect wires to Ring Pro 2:
- Strip 1/4″ of insulation from wire ends if needed
- Connect wires to the two terminals on the doorbell (doesn’t matter which wire goes where)
- Tighten terminal screws firmly
- Mount the Pro 2:
- Attach the mounting bracket to your wall/door frame
- Tuck excess wire behind the bracket
- Snap the doorbell onto the bracket
- Secure with the provided security screw
- Turn power back on and complete setup:
- Flip the breaker back on
- The doorbell will light up
- Follow the in-app setup process
- Test your indoor chime (it should ring!)
Total installation time: 30-45 minutes
Common issue: If your indoor chime doesn’t ring, double-check the Power Kit Pro installation. This is the most common mistake.
How to Set Up Ring Doorbell (First-Time Configuration)
Once your doorbell is physically installed, here’s how to complete the setup:
- Open the Ring app and tap “Set Up Device”
- Scan the QR code on the back of your doorbell (or enter the serial number manually)
- Connect to Wi-Fi:
- Select your home Wi-Fi network
- Enter your password
- Wait for connection (30-60 seconds)
- Tip: Stand next to your router during setup for strongest signal
- Name your device (e.g., “Front Door,” “Back Patio”)
- Test your doorbell:
- Press the button
- Check if you receive a notification
- Test the video quality
- Try two-way talk
- Set up motion detection:
- Tap “Motion Settings”
- Draw motion zones (only cover your property to avoid false alerts from cars/pedestrians)
- Adjust sensitivity (start with medium, adjust later if needed)
- Choose motion frequency (how often it detects motion)
- Configure notifications:
- Choose which devices get alerts
- Set “Modes” for Home/Away/Disarmed
- Schedule quiet hours if desired
- Link to Alexa (optional):
- In the Ring app, go to Account → Alexa
- Link your Amazon account
- Say “Alexa, show me the front door” on Echo Show devices
Setup time: 10-15 minutes
🔄 How to Reset Ring Doorbell (Complete Guide)
Need to reset your Ring doorbell? Here’s when and how to do it:
When to Reset Your Ring Doorbell:
- Changing Wi-Fi networks
- Doorbell not responding
- Installing a used doorbell
- Troubleshooting connectivity issues
- Preparing to sell/give away the device
How to Reset Ring Doorbell (All Models):
For Battery Doorbell:
- Remove the doorbell from its mounting bracket
- Locate the orange button on the back
- Press and hold for 15-20 seconds
- The light on the front will flash a few times
- Release when the light starts spinning
- Wait for the doorbell to restart (1-2 minutes)
- Set up again in the Ring app
For Ring Video Doorbell Pro/Pro 2:
- Locate the small reset button on the right side
- Press and hold for 15-20 seconds (use a paperclip or pin)
- Wait for the light to flash
- Release and allow the doorbell to reboot
- Re-add to the Ring app
How to Reboot Ring Doorbell (Without Full Reset):
Sometimes you just need a quick reboot (doesn’t delete settings):
- Open the Ring app
- Tap your doorbell
- Go to “Device Health”
- Scroll down and tap “Reboot This Device”
- Confirm and wait 1-2 minutes
Or press and release the setup button once (doesn’t factory reset, just restarts)
🔌 How to Charge Ring Doorbell Battery
Charging Your Ring Battery Doorbell:
- Remove the doorbell:
- Press the release tab at the bottom
- Lift the doorbell off the bracket
- Connect the charging cable:
- Use the included USB-C cable (newer models) or micro-USB (older models)
- Plug into any USB power adapter
- Monitor the charging light:
- Red/Orange: Still charging
- Green: Fully charged
- Charging time: 4-6 hours for full charge
- Reinstall the doorbell:
- Line it up with the bracket
- Press until it clicks
- Secure the security screw
How to Check Ring Doorbell Battery Level:
- Open the Ring app
- Tap your doorbell
- Tap “Device Health”
- Check the battery percentage at the top
Pro tip: Set up a low battery notification so you get an alert when it drops below 20%.
Battery for Ring Doorbell – Replacement Options:
Original Ring batteries:
- Ring Quick Release Battery Pack: ~$30 on Amazon
- Compatible with: Battery Doorbell, Spotlight Cam, Stick Up Cam
Why buy a second battery?
- Swap instantly when the first dies (no downtime)
- Keep one charging while one is in use
- Essential for high-traffic areas
👉 Shop Ring replacement batteries on Amazon
Solar panel option:
- Ring Solar Panel (~$50): Keeps battery continuously charged
- Works with: Battery Doorbell, Spotlight Cam, Stick Up Cam
- Requires just 3-4 hours of direct or indirect sunlight daily
- Essentially provides “unlimited” battery life
🔧 How to Remove Ring Doorbell
How to Remove a Ring Doorbell (Battery Model):
- Locate the security screw at the bottom (uses included star-shaped screwdriver)
- Remove the security screw completely
- Press the release tab (small button at bottom)
- Lift the doorbell up and off the bracket
To remove the mounting bracket:
- Simply unscrew the 2-4 mounting screws
- Fill holes with spackle if needed
How to Remove Ring Video Doorbell Pro:
- Turn off power at the breaker
- Remove the security screw at the bottom
- Use the included release tool (or a small flathead screwdriver)
- Insert tool into the release holes at the bottom
- Push and lift to detach from bracket
- Disconnect the wires from the terminals
- Unscrew the mounting bracket from the wall
Important: If you’re removing the Pro permanently, you’ll need to reconnect your old doorbell wiring or install a wire cap on the wires.
📶 How to Change WiFi on Ring Doorbell
Moving to a new router? Changed your Wi-Fi password? Here’s how to update it:
How to Change Ring Doorbell WiFi:
Method 1: In-App (Easiest)
- Open the Ring app
- Tap your doorbell
- Tap “Device Health”
- Tap “Change WiFi Network” or “Reconnect to WiFi”
- Follow the prompts:
- Press the setup button on your doorbell (once)
- Wait for the light to flash
- Select your new WiFi network
- Enter the password
- Wait for connection (30-60 seconds)
Method 2: Full Reset (if Method 1 doesn’t work)
- Reset your doorbell (see reset instructions above)
- Set it up again in the app as a new device
- Connect to your new Wi-Fi network
Troubleshooting WiFi Connection Issues:
- Ring doorbells only work with 2.4GHz WiFi (not 5GHz)
- Check if your network name has special characters (can cause issues)
- Move closer to your router during setup
- Restart your router before attempting to reconnect
- Check that your internet is working on other devices
WiFi signal strength matters:
- RSSI -40 to -50: Excellent
- RSSI -51 to -60: Good
- RSSI -61 to -70: Fair (may have issues)
- RSSI -71 or lower: Poor (needs improvement)
Check your signal strength: Ring app → Device → Device Health → Signal Strength
Solution for weak WiFi: Install a WiFi extender or upgrade to a mesh network system (like eero, which Amazon owns).
🔔 Ring Doorbell Chime: Getting Your Indoor Bells to Work
Does Ring Doorbell Work with Existing Chime?
It depends on the model:
- Ring Battery Doorbell: No, it won’t ring your existing mechanical chime (but you can buy a Ring Chime accessory)
- Ring Video Doorbell Pro 2: Yes! Works with existing hardwired chimes (with Power Kit Pro installed)
Ring Doorbell Not Ringing Inside? Here’s Why:
For Battery Doorbell:
- This is normal—battery models don’t connect to wired chimes
- Solution: Buy a Ring Chime or Ring Chime Pro
For Wired Doorbell Pro:
- Check that Power Kit Pro is installed correctly in your chime box
- Verify chime type is set correctly in app (mechanical vs. digital)
- Test doorbell voltage (needs 16-24V AC)
- Make sure chime volume isn’t turned down
- Try a different chime type in app settings
Ring Doorbell Chime Options:
Ring Chime (1st or 2nd Gen):
- Plugs into any outlet
- Price: ~$30
- Plays customizable tones when doorbell pressed or motion detected
- Range: Works anywhere in your home with WiFi
Ring Chime Pro:
- Plugs into outlet + extends WiFi signal
- Price: ~$50
- All Chime features PLUS acts as a WiFi extender
- Ideal if your doorbell has weak WiFi signal
Chime for Ring Video Doorbell – Setup:
- Plug Chime into outlet near your router
- Open Ring app
- Tap “Set Up Device” → “Chime”
- Press the button on the Chime
- Connect to WiFi
- Link to your doorbell(s)
How to Change Ring Doorbell Sound:
- Open Ring app
- Tap your Chime device (not the doorbell)
- Tap “Audio Settings”
- Choose different tones for:
- Doorbell press
- Motion alerts
- Adjust volume
- Save changes
Available sounds: Classic chimes, bells, barking dogs, seasonal sounds, and more!
🔵 Ring Doorbell Flashing Blue: What It Means
Seeing lights on your Ring doorbell? Here’s what they mean:
Ring Doorbell Blinking Blue:
- Solid blue light: Doorbell is starting up/booting
- Spinning blue light: Doorbell is connecting to WiFi or processing
- Blue light moving upward: Someone pressed your doorbell button
- Rapidly flashing blue: Call in progress (Two-Way Talk active)
Other Ring Doorbell Light Patterns:
- Solid white light spinning: Doorbell is in setup mode
- White light flashing on and off: Firmware update in progress (don’t disconnect!)
- No light: Doorbell is idle or battery is dead
If blue light won’t stop flashing:
- Wait 2-3 minutes (it may be updating)
- Check Device Health for update status
- If stuck for 10+ minutes, reboot the doorbell
- If still stuck, perform a factory reset
Leave a Reply